Showing posts with label OPI. Show all posts

Sunday, 15 September 2013

Leopard print fun

I promise I haven't disappeared or given up on nail blogging - I've just been reaaaaallllyyy busy recently. I also unfortunately have an exam in a few weeks, so any manis I manage to blog about until that has passed are likely to be quick 'n' easy - although that's surely never a bad thing??!! Nail art still provides a welcome distraction though - there are only so many times I can read about earned value formulae and stakeholder management theories (zzzzzzzzzzz).

I decided to continue with the animal theme this week and try out a leopard print mani - plus I knew it would be quick to do which was a definite plus :)

with flash inside
 One big downside of the colder weather and shorter days coming in is the lack of natural sunlight to take nail pics in - I may have to think about investing in a lightbox for pictures (what I really mean is I might need to bribe my husband to make one ;) ).

without flash
 I do love the cool weather though - I sleep with the window open so the crisp night air always clears my head (although the mornings can be a bit nippy and that means a dash to the warmth of the bathroom)!

flash again
For this mani I started with two coats of 'A Butterfly Moment' from the OPI Mariah Carey collection, then used 'You Don't Know Jacques' for the brown blobs. Finally I finished by using my Barry M nail art pen in black to make the outlines and adding a coat of Seche Vite top coat.

side view
 I quite like it and will likely give the neon or pastel variants a go too at some point, especially when my nails get long again!

What do you think, are you enjoying the cooler weather? Have you ever tried a leopard print mani?

Fx


Wednesday, 28 August 2013

Foxy baby!

The unthinkable happened - I broke two of my lovely long nails :(

I don't think I had properly cut them (apart from shaping) for a few months, and was feeling pretty pleased with myself and smugly self congratulatory. So when two broke within as many days I was surprising upset - and very, very annoyed!

Having short nails just feels weird - I can't pick sellotape on the roll, can't drum my nails loudly on my laptop (annoys my husband greatly, one of my pleasures in life ;) ) and I'm able to type without making a multitude of errors - ok well maybe the last one is a bonus.

The biggest annoyance of all though is how much is restricts what designs I can do with my nails - I know plenty of bloggers have short nails by default and they do a fantastic job, but for me I'm used to having that extra canvas to work with. So - it will be simple nail art for a while I think!

And with that it's on to today's post! I saw this design months ago and for the life of me can't find it again (always like to give credit), and as it was fairly simple while being a little different, I felt now was the time to do it.

In sunlight

I started with 3 coats of MUA 'Fever Red' as my base, then used OPI 'You Don't Know Jacques' for the 'fur' of the fox. Ideally you would use a lighter colour of brown or even dark orange for this, but it's not a colour I have  a lot of so had to make do.

partial shade

I then used a nail art brush for the white on the fox using NYC 'Pinstripe White' and finished off with some black dots for the eyes and nose using China Glaze 'Liquid Leather'.

side view

You could do this design on all of your nails, it's really easy to do and not too fiddly, but I decided to stick with an accent nail :)

We get a lot of urban foxes round where I live as we're really near to some woods - I might need to ask them what they think!

What do you think, have you used animals in nail art before? My next attempt is sure to involve bunnies!

fx

Wednesday, 14 August 2013

Pastel galaxy mani

I've been dying to try out a galaxy mani for aggggeesss and finally decided to attempt one at the weekend. I particularly like pastel versions, and a quick search brought me to a tutorial posted by The Nailasaurus here. I pretty much followed it to a T using the list of polishes below.

artificial light

I used the following polishes for my 'basic' colours;

  • OPI 'Thanks a Windmillion' (sea foam green) - used as the base
  • Sally Hansen 'Yellow Kitty' (yellow)
  • MUA 'Bold Blue' (blue)
  • Rimmel 'Marshmallow Heaven' (purple)

artificial light
 I then used the following colours for little splashes of shimmer to make it all look more ethereal;

  • OPI 'Not Like The Movies' (shimmery green/silver)
  • OPI 'Play The Peonies' (pale pink pearl)
  • OPI 'Significant Other Colour' (sheer lavendar/yellow duochrome)
natural light, partial shade
 Once that had all dried I dotted on some NYC 'Pinstripe White' to make the stars, and topped with a coat of Seche Vite for strength. Later I then applied two coats of Rimmel 'Matte Finish' to give a matte effect.
Partial shade
 My favourite nail polish in this line up is 'Not Like The Movies' from the January 2011 Katy Perry collection, which is a silvery green and light purple duocrome with some silver microglitter mixed in. Its one of the first few OPI polishes I bought and I haven't even looked at it for at least a year - I'll definitely be using it again in the near future!

all of the polishes together!
What do you think, do you like galaxy manis? When I try this next time I'll vary the pattern across the nails I think, but I'm very pleased with my first attempt!

Fx

Friday, 9 August 2013

Understated OPI saran wrap mani

I haven't managed to post anything this week (or even do anything fancy with my nails) as I've been feeling a little under the weather - I know, get the violin out eh ;) - so was determined I would do a mani and post tonight, albeit something relatively simple.

I decided to have another go at a saran wrap mani with colours I wouldn't normally choose to use, just to see what happened. It turned out fairly well but I'm definitely not in love with it! Never mind, I'll do a better one tomorrow :D

natural light

I started off with two coats of 'A Butterfly Moment' from the spring 2013 Mariah Carey collection. This is a pinky peach with gold shimmer, and is surprsingly quite likeable when you have it on.

I then put on one coat of 'Are We There Yet' from the autumn 2011 Touring America collection and dabbed it off with clingfilm. This is a really nice peachy orange shimmer, and while I would never, ever choose orange - I would seriously think about wearing this on it's own.

partial light
 Finally I applied a coat of 'Play The Peonies' from the spring 2011 Nice Stems collection. This is a very pale oyster pink with a pearl finish, and is one that I love as I wore it on my wedding day (awwww).

artificial light
 For a little accent I applied an owl decal and finished off with Seche Vite. I really like decals at the moment and have quite a few to play with. This is one I'll use quite a lot in autumn I think - I don't know why but owls mean autumn to me!

L-R: A Butterfly Momemnt, Are We There Yet?, Play The Peonies, Seche Vite

What do you think, do you like the colours together? Do you have any of these? I'm off to enjoy a friday night Amaretto and lemon :)

fx

Saturday, 3 August 2013

Nice mani, but rubbish topcoat!!

After my first go at a gradient mani (I won't post that, it's not worth the two minutes of your life you'd waste reading it ;) ) I decided to have another go combined with a dot manicure. I was really pleased with how it turned out until I put on topcoat - and subsequently ruined it :(

I decided it was still worth posting though, if for nothing else it warns others not to use that particular topcoat!

in sunlight
I started with three coats of NYC 'Pinstripe White' on all of my nails, then waited for it to dry completely. I then applied the gradient on to my thumb and ringfinger using the following colours;

  • China Glaze 'Below Deck' (dark purple)
  • NYC 'Downtown' (reddish purple)
  • Sally Hansen 'Fairy Teal' (teal)
  • MUA 'Ameretto Crush' (peachy pink)
before the gradient

 I then dotted on the same colours in a random pattern on my other fingers with a mixture of large and small dots.

You can see the mess a gradient manicure makes in the pic below, total nightmare to tidy up but worth it :)

Indirect sunlight
 The next step was to add white dots on to the nails with the gradient pattern carrying the theme through all of the nails.

Finally, I added topcoat. Now, normally I use Seche Vite but my bottle has less than half left now, and as anyone who has used it before knows it starts to get a bit thick and gloopy about then, and causes some major shrinkage on your nails. So I decided to give another top coat I have a go - OPI Rapidry.

BIG mistake - as you can probably see in the pic below the dots all bled after I applied the top coat. At first I thought I hadn't let everything dry enough (although I was sure I had), but tried using Seche Vite on my other hand and it was absolutely fine. Therefore I can only blame the topcoat and won't plan to use this again!

Sunlight
 What do you think, have you ever used this topcoat before? Did you like the mani before it all went wrong?

I'm away to take this mani off now and put on some plain polish *sob*

Fx

P.s. if the mani was staying I would clean up my cuticles a bit more as there is some staining, but didn't see the point really :)

Tuesday, 30 July 2013

Spotty dotty manicure

My dotting tools finally arrived last week - yaaaay! So I (of course) had to give them a go with a spotty, dotty mani. I've seen quite a few variations of this so it's by no means a unique or complex design, but I really like it - it's fun :)

in sunlight
I started off with 3 coats of OPI 'Did you 'ear about Van Gogh' from the 2012 spring Holland collection. This is a lovely light beige creme and will be really useful to have as a neutral base for manis in the future!

I then dotted on Sally Hansen 'Grass Slipper' (the green dots) with two big dots and 3 small dots on each nail, followed by the same of OPI 'Anti Bleak' (purple dots).

with flash
  Once those had tried I dotted Barry M 'Shocking Pink'on top of the green dots and 3 smaller dots arond, then Barry M 'Peach Melba' on top of the purple dots and around. I then finished with a topcoat of Seche Vite (of course).

indirect sunlight

I really like this effect and plan to repeat in the future with different colour combinations, and to perhaps spice up with some stripes. What do you think, do you like the colours? Have you tried this before?

Fx

Friday, 26 July 2013

Striping mani with bright colours

My striping tape came from China - FINALLY! Five weeks I've been waiting for these bad boys to  get here, so naturally I had to try them out in a mani IMMEDIATELY!

I'm going to say this up front though - I don't really like this mani, it didn't come out all that well and I definitely need to practise more! Although I was a little distracted as I was putting it on when all the media coverge of the royal birth started, so I'll maybe blame it on that ;)

indirect sunlight

I think when I try it again I'll be very careful not to flood my cuticles as I think that's why it looks so messy with the white peeking through.

So, to start off with I applied four coats of OPI 'Funny Bunny' which is a fairly sheer milky white creme. Now anyone who knows me in real life will know I bought this polish for the name only, and it will most definitely not become my 'go to' white polish!

with flash inside

I then applied the striping tape in the pattern you see with a fair amount of help from my husband, and painted on two coats of;

Barry M Gelly 'Guava' (the blue polish)
Barry M 'Shocking Pink' (the pink polish)
Barry M '325' (the green polish)

I took the tape off while the polish was still tacky, although the tape had stained a little on my thumb nail so I had to go over the white with my Barry M nail art pen. I then topped off with a coat of Seche Vite as usual.

I was really disappointed with the geen polish, which is a limited edition from the summer range. It looked so rich and vibrant in the bottle but came out pretty wishy washy on the nail.

Partial shade

I do quite like the three colours together though!

What do you think, do you like the pattern and colour combination? If you've tried striping before did you need help? Any tips (please)?!

fx

Tuesday, 23 July 2013

Blue and white polka dot mani

I received a fairly large haul on Saturday - about 25 new polishes and a variety of nail art peripherals. So it was inevitable that I would spend most of Saturday morning trying out some of the goodies!

in shade outside
 I started with four coats of OPI 'I have a Herring Problem' from the 2012 spring Holland collection. This is a lovely dusky blue with both gold and silver micro glitter. It's a gorgeous polish but a bit thin - hence the 4 coats!

I then took the Barry M White nail art pen and dotted on polka dots all over my nails. Now this was a total pain in the bum to do and many swear words were uttered, but I do love the finished result!

in sunlight

Finally I drew on a heart on my ring finger then went round it with the same nail art pen in black. I will confess - this is my 2nd attempt as the 1st one was a total disaster! And a coat of Seche Vite to finish it all off.

partial sunlight
 I'm really pleased with this mani and will definitely be doing it again (or some kind of variation of it anyway). What do you think? Have you tried the nail art pens out yet?

Fx

love the shimmer!

Friday, 19 July 2013

Mint mani for Talia

Many of you have probably heard of the 13 year old blogger Talia Joy Castellano who become famous for her beauty and fashion vblog on Youtube.

Talia tragically lost her 6 year battle with neuroblastoma on Tuesday this week, and as a tribute to her memory many nail and fashion bloggers are dedicating posts to her. The last mani she posted was a mint design, so many nail bloggers are posting mint manis in her memory.

As you know I haven't been blogging for all that long, but I've known of Talia for a couple of years so felt I wanted to contribute. Loss of life at any age is sad, but it seems especially tragic when someone so young, bright and full of life passes away.

You can see Talia's work on her Youtube channel here.

artifical light
For my mani I decided to go simple and sparkly with 3 coats of MUA 'Pistachio Ice Cream' followed by one coat of OPI 'Rainbow Connection' from the 2011 Muppets collecion.

'Ranbow Connection' is a clear polish with different sizes of hexagonal glitter in silver, pink, yellow, green, blue and orange. It sold out very quickly when it was released and is now another relatively rare polish increasing in value.

artifical light

polishes used
I added some fimo hearts to the design as well - although I confess it was meant to be one in the centre but I had a little mishap! It kind of looks like those love heart sunglasses you get though which I could totally have seen Talia wearing, so hopefully it's ok :)

My thoughts are with Talia's family

Fx

Thursday, 18 July 2013

Hot pink waterfall mani

So after I removed the beads from my nail constellations mani and repainted my ring fingers with MUA 'Bright Pink', I decided to give a waterfall mani a go. I've seen a few blog posts on this recently and it seemed relatively easy to do while being pretty and eyecatching - perfect all round really :)

partial sunlight
I had a rummage through my collection and decided to go for a variety of colours. I used;

  • MUA'Pistachio Ice Cream' (mint green)
  • MUA 'Bold Blue' (light blue)
  • OPI 'Anti Bleak' (dark purple)
  • Rimmel lasting finish 'Marshmallow Heaven' (light purple)
This seemed like quite a summery combination to me and I really liked the colours against the hot pink. I only wish I had invested in some half decent brushes as I found it quite hard to paint the strokes on - they should really be a bit more delicate than they turned out!

direct sunlight

I went over some of the strokes twice as they needed some opacity to stand up to the pink, then finished off with Seche Vite topcoat.

closer up

polishes used
What do you think, do the colours go together well? Have you tried this design before? If you know of any good nail brush kits please let me know :)

fx

Wednesday, 17 July 2013

Sea colours saran wrap mani

The weather has been so lovely in the UK lately that it instantly makes me think of being on a beach beside a beautiful shimmering aquamarine sea (I wish ;) ). With that in mind I decided to try and capture that feeling on my nails!


In direct sunlight
 I started off with a base of OPI 'Glacier Bay Blues' as per my previous post, then added a coat of OPI 'Thanks a Windmillion' on top. I then used saran wrap (otherwise known as clingfilm) to achieve the first layer of my mani.

'Thanks a Windmillion' is one of my favourite colours, it's a lovely seafoam coloured creme and gives really good coverage - from memory you only need 2 coats for full opacity.

In direct sunlight
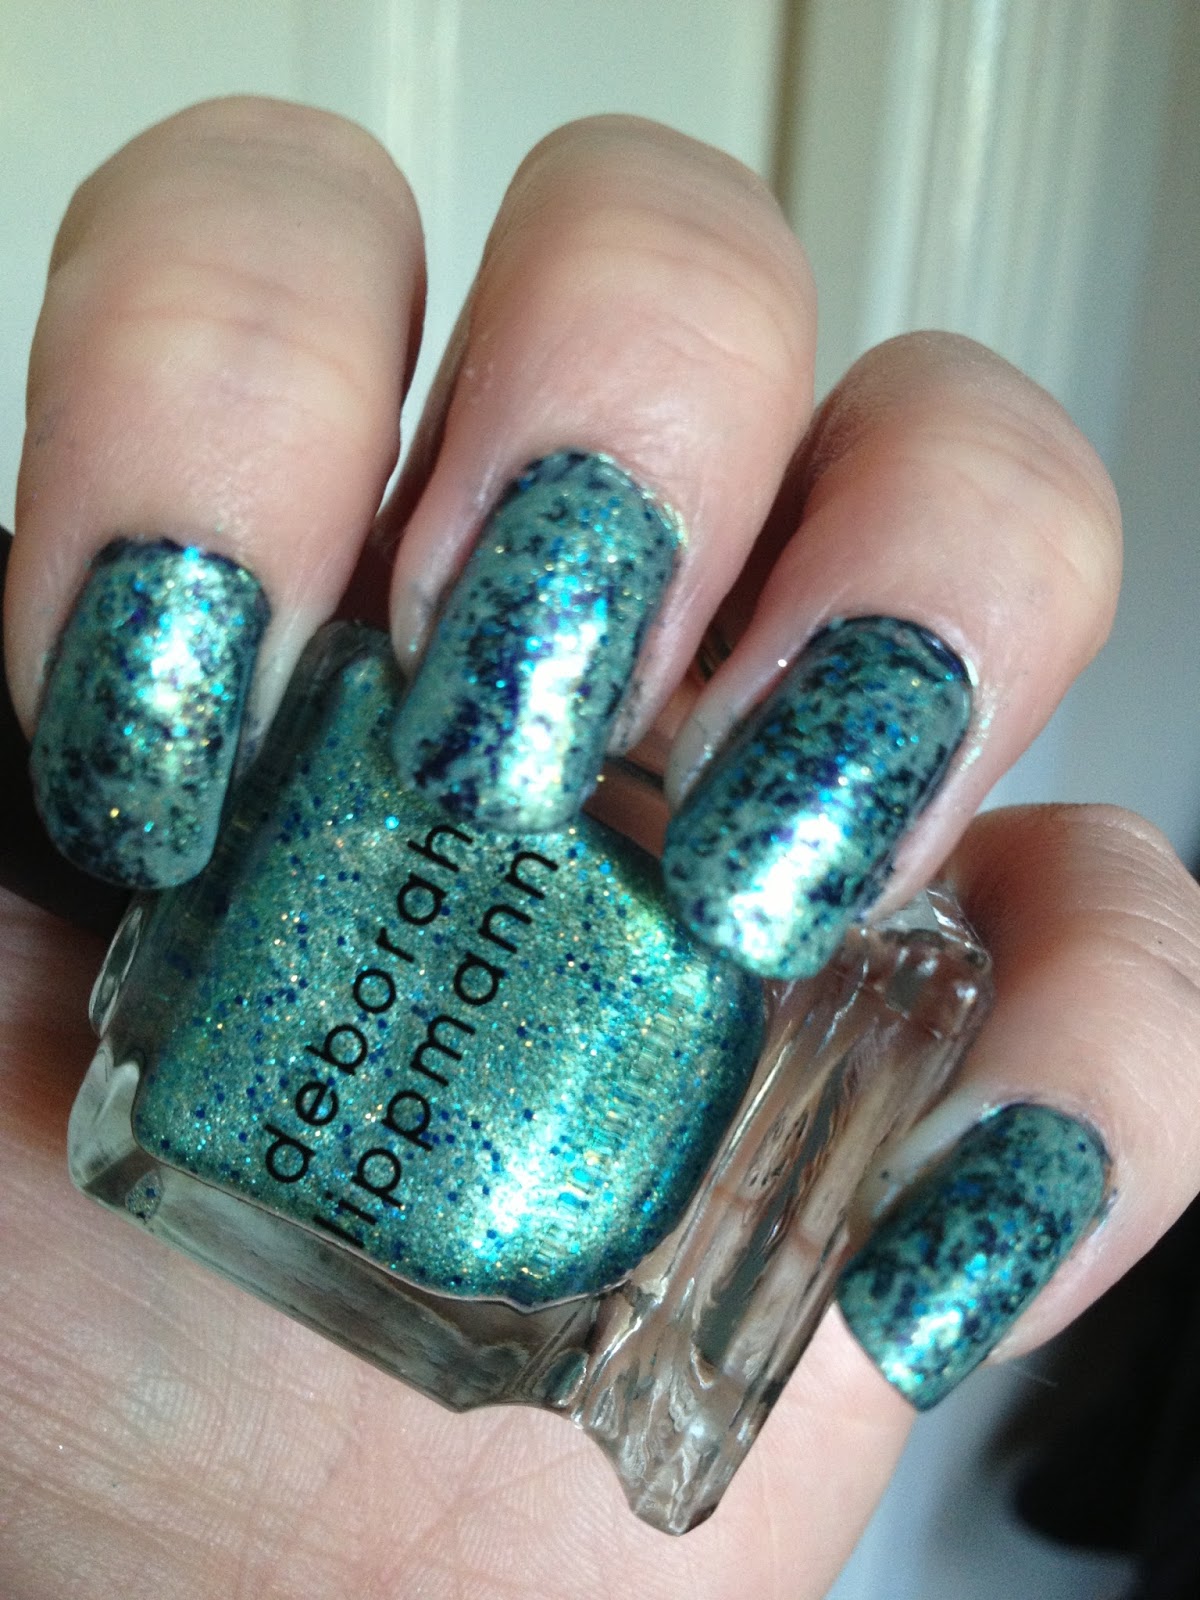
 Once that had dried I added a coat of Deborah Lippman's 'Mermaid's Dream' and used clingfilm again. When I had looked at 'Mermaid's Dream' previously it seemed to be quite a thin, watery formula so I had used 'Thanks a Windmillion' to boost opacity, but as you can see 'Mermaid's Dream' completely covered poor 'Thanks a Windmillion'!!!

Nevertheless this is a beautiful polish - a turquoise metallic base with blue and gold micro glitter and blue sequins. Just like a mermaid's tail :)

Partial shade

Indirect sunlight

 This mani didn't turn out quite as I had planned, as I thought the 'Mermaid's Dream' would be more subtle and would be flashes of colour on top of the other two coats. I still like it though - I would do it again in the future and with other colours.

What do you think, do you like the colours? Can you see 'Thanks a Windmillion' peeking through?

Fx

Sunday, 14 July 2013

OPI 'Glacier Bay Blues' swatch

Well, as predicted, the bow in my previous mani fell off fairly quickly resulting in a ruined nail. It happened in the toilet of a restaurant I was at with family today, so I was not best pleased!

However, this means I can now legitimately paint my nails again without feeling like I'm wasting polish - yay!

Today I decided to use OPI 'Glacier Bay Blues' as the base for a more complex mani (which I'll post later), and as it's considered a very rare polish I thought it was worth doing a separate swatch post.

I bought this polish a couple of years ago when I started to become interested in nail polish, and have only used it a couple of times since. After today I remember why - it really is an AWFUL formula!

This is from the OPI 2004 Canadian collection and features their old formula (e.g. not 'big 3' free) and the old, thin brush. I do miss the pro-wide brush!

In direct sunlight
This a green and blue /purple (or blurple) duochrome. It's really hard to capture the effect it has on the nail, but you can probably see the two tones in the bottle in my pictures - this is how it actually looks on the nail.

As I mentioned previously it's a terrible formula - very watery and streaky, and it takes aggggges to dry between coats. I had to apply four coats to get the opacity you see in these pictures.

with flash in shade
If it wasn't for the scarcity of this polish I would probably sell it to be honest - but as it sells for upwards of £20 these days I think I'll hold on to it and hope it increases further in value ;)

indirect sunlight
What do you think, do you like the duochrome effect? Is it worth the pain of the poor formula?

Keep tuned for my next blog post to see how I use this as the base for a saran wrap mani :)

fx

Saturday, 13 July 2013

OPI 'You Don't Know Jacques!' with bow nail art

My newest nail varnish purchase is the revered 'You Don't Know Jacques!' by OPI. This is probably one of the most famous OPI polishes ever made and has been copied (or 'duped) countless times by other brands. It was originally released in the 2008 autumn 'Collection de la France', and has became part of the permanent 'Classics' collection since then.

It's a brown taupe creme and in the bottle isn't something I expected to like - however I have to admit I really loved it on the nail! My only gripe is the formula is quite watery so needs at least 3 coats for even coverage.

 I decided to jazz it up with some nail art seeing as the weather is so nice in the UK at the minute.

In sunlight
I used 3 coats of OPI, then painted a cross on to my nail using Barry M 'Amethyst Glitter'. This is a nice glitter that I often use for gradient manicures as it's easy to drag evenly on the nail.

I then applied a topcoat of Seche Vite, then glued on a nail art diamante bow. The bow is much bigger than I expected and I think it will be gone within a couple of hours! I'm far too rough 'n' ready to keep something like that on! It looks pretty for now though, huh?

In sunlight again

Polishes used
 What do you think, do you like this colour? Do you already own it?

I've recently purchased quite a few nail art props and tools so will be experimenting with those over the next few weeks. In the meantime here is a pic of a mani I painted earlier in the week, but didn't have enough pictures of it in a good state to do a dedicated post. It has 3 coats of OPI 'Dulce de leche', Seche Vite topcoat, and a piece of fimo nail art (an ice cream cone as homage to the good weather :) )

'Dulche de Leche' is one of my favourite nail polishes and is used a couple of times a month at the moment!


I hope everyone is enjoying the good weather as much as I am!

fx

Friday, 5 July 2013

OPI 'Anti Bleak' and 'Significant Other Colour' petrol mani

I apologise in advance - I did this mani a few days ago and after some heavy housework (do not dispute this husband!), my finish has seen better days. Please ignore the chips!

In natural daylight, no flash
Nonetheless I quite like the effect of this mani and plan to do this again in the future, both with this combo and other base colours.

I started with 2 coats of OPI 'Anti Bleak' from the Mariah Carey collection. This is a deep purple creme with a nice red hue to it - it works really nicely with the glitter 'Pink Yet Lavendar' from the same collection (I'll do another mani with this later).

In natural daylight, with flash
I then added one coat of OPI 'Significant Other Colour' which is a sheer pearl lavendar and yellow/green duochrome. Now I confess I'm not a huge fan of this polish on it's own - but when added on top of another colour - wow! I love how the polish looks completely different depending on how the light hits it.

Inside - with flash

I then finished off with one coat of Seche Vite Dry Fast Top Coat - my go to top coat.

I's quite hard to capture the different dimensions of this polish, but hopefully you can see what I mean.
The polishes used in this mani

What do you think - do you like the effect? I call it a petrol mani after the beautiful colours diesel/petrol make :)

fx